Check our Youtube channel for further guidance
1. LOGGING IN
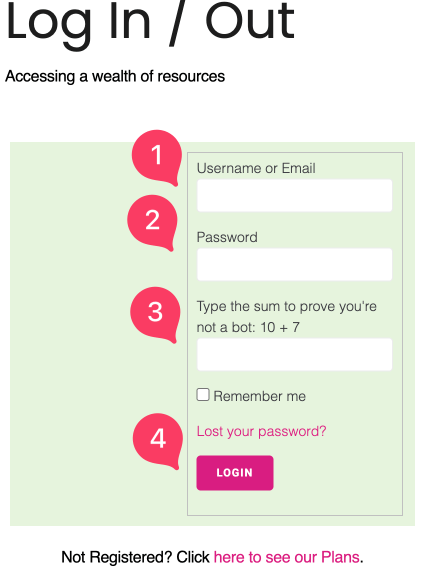
To log in, please click on Login / out button at the top of the page.
A pop-up form will display. Enter your username or email and password and then click on Login.
2. MEMBERS’ AREA
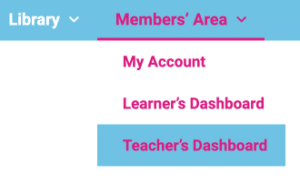
Once logged in, the Members’ area menu items will appear. See image below.
For individual subscribers and students, there will be two links: My Account and Learner Dashboard.
For Group Leaders/ teachers, there will be two links: My Account and Teacher Dashboard.
To access the teacher’s dashboard, click on Teacher Dashboard.
The following page with the below functions appears:
3. ADDING STUDENTS TO GROUPS (CLASSES)
When you click the Users button, you can choose between adding one user or adding multiple users.
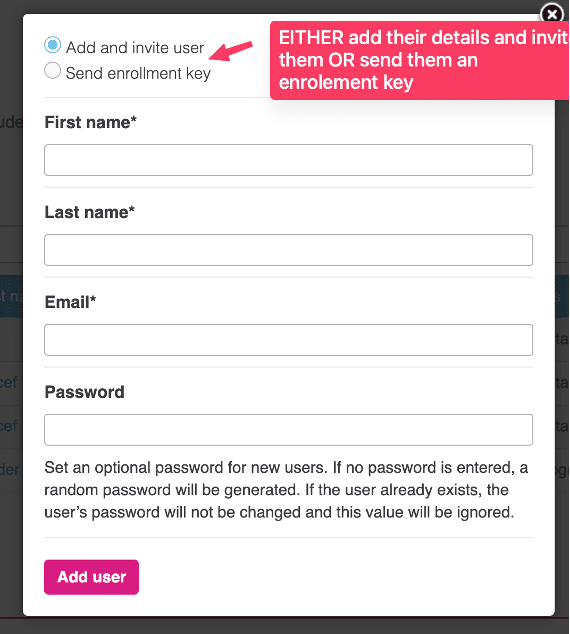
If you select Add one, a form appears with two options:
A. Add and invite user:
Enter the student’s first name, last name, and email address to add them to a group. Once you click the Add User button, an email is sent to the student. The student is added to the list of students in the group and they take up a seat in your group, and their status is set to Not Started.
B. Send enrollment key:
Enter the student’s first name, last name, and email address to send them the Send enrollment key Once that student registers and redeems that key, they take up a seat in the group, are enrolled in the group and can begin group courses.
4. REMOVING STUDENTS FROM GROUPS
To remove students from a group, select the students you would like to remove from the Enrolled User list, and a Remove User(s) button will appear. Click on the Remove User(s) button. You will be prompted to confirm your action.
Once a learner has begun completing the courses that are available in the group, or if they have completed all of the courses and their status is set to Completed, it may no longer be possible to remove them from the group.
5. RESETTING USER PASSWORDS
To generate password reset emails for students that may have forgotten their passwords, select the user(s) from the list, and a Send password reset button will appear. Click Send password reset and the user will be emailed a link to reset their password.
6. ADDING USERS IN BULK
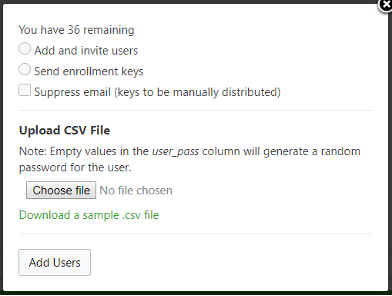
Students can be added in bulk by clicking Users > Add multiple, or by clicking Users > Upload Users and uploading a CSV file.
The Upload Users form has options similar to those described above, with one major difference. When uploading a CSV file, you can choose not send an email to the list of users you are uploading. You might want to do this if you plan to distribute enrollment keys to your users some other way.
For the bulk upload to work properly, a CSV file formatted with the following column order and headings must be used: user_email; user_pass; first_name; last_name. CSV files that have incorrect formatting of email addresses, column names, etc will not be uploaded. You can download a sample file here: group_management_user_upload (.CSV file, 74 bytes). If the user_pass cells are blank, a random password will be used, but the column heading should still be included. A column for “username” can optionally be included as the first column but is not required; if it exists but is left blank, username will default to the email address.
If you click Users > Add multiple, the Bulk Add & Invite Users form appears.
Users added to this form will receive an email. The users are added to the list of users in the group and they take up a seat in your group, and their status is set to Not Started.
7. DOWNLOADING GROUP KEYS
To download a full list of enrollment keys to be used for manual tracking, reporting, and distribution, simply click Users > Download Keys and you will begin downloading a CSV file. This list is the current list of unassigned keys for that group. This list is updated when the number of seats is initially set for the group and when additional users and seats are added or removed from the Group.
8. GENERATING REPORTS
When a student submits a quiz, the result is registered. To see the result and the answers submitted, click on Quiz Report:
Choose the course you want to see the progress made in then click on the Detailed Report icon. You can also export the results to a CSV file.
To see the progress the students made in the courses, click on Group Progress Reports, then choose the course, then you can see the percentage of completion of the course per student. See below:
Please instruct the students to click on Mark Completed button at the bottom of the page so this counts in their general progress. The lesson will not be included in the stats if the student does not want to ‘complete’ that lesson and wants to go back to it later.
9. DOWNLOAD OR PRINT LEARNER CERTIFICATES
Group Leaders (teachers) can download or print any certificates the learner has earned. These include both certificates attached to courses and certificates attached to quizzes. Once the learner has completed a course or a quiz with a certificate attached, a Certificate button will appear in the corresponding row:
10. GRADEBOOKS
A. Usage
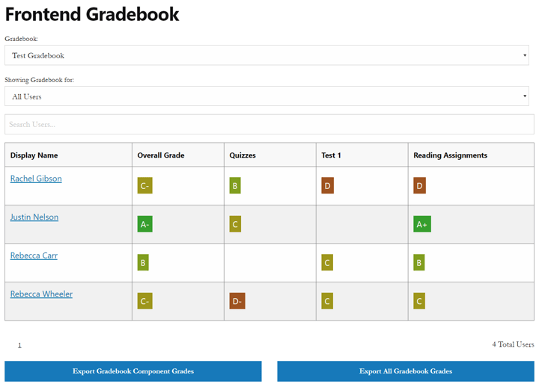
Each row in the table provides information about a single user and their overall grade and any other pre-defined Component grades.
B. Sorting
Clicking on any column header will reload the page with all user results sorted by the selected column in ascending order, indicated by an upwards-facing triangle next to the column header. Clicking the same column header will reload the page with the results sorted in descending order.
C. Report Card
The Report Card is a presentational tool to give users information about their grades for a gradebook.
D. Display
The report card contains information about the user’s overall grade, individual Component grades, and individual scores on various grade details. Clicking on any Component, or the arrow to the left will expand a breakdown of scores. Scores can be manual grades, quizzes, assignments, lessons, or topics.
11. SUBSCRIPTION INFO
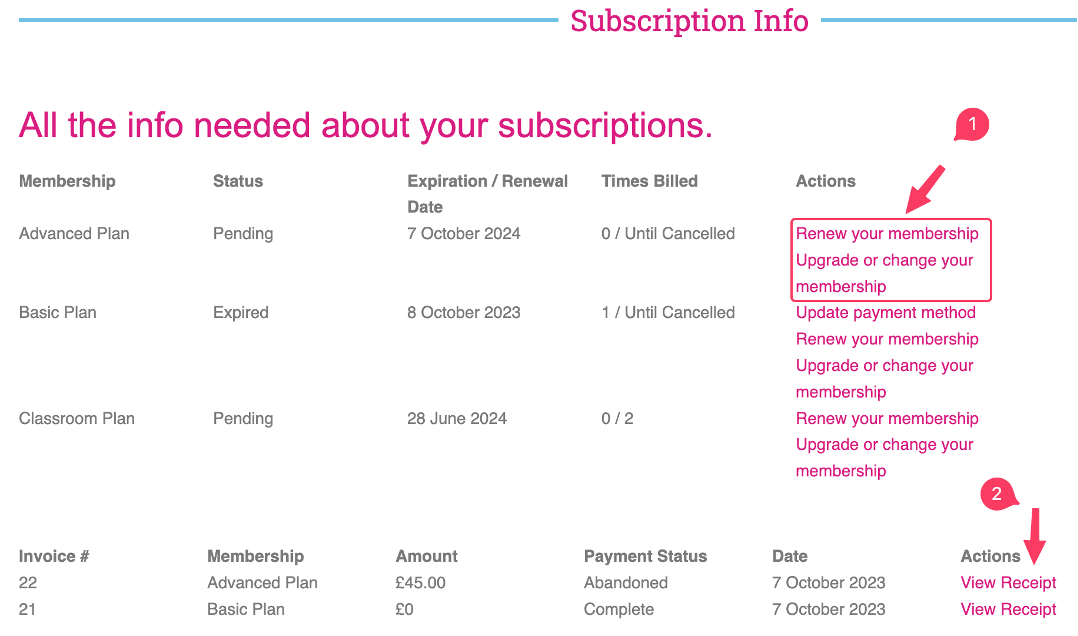
Under My Account Page, you will find two sections: Update My Profile and Subscription Info.
In Subscription Info, clicking any of the links will provide you with information on your subscription.
On the bottom part of the page, clicking on View Receipt will provide you with information on your payments and you will be able to print your receipt if you wish to do so.
12. Assignment
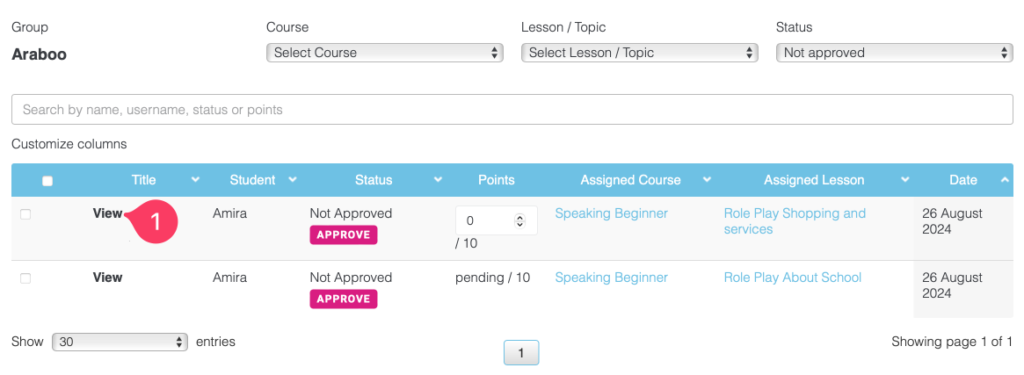
Under Assignment Uploads Page, Group Leaders can:
- Download and review assignments submitted by students in their group and quickly access the associated lesson, course or comments
- Approve and assign points to assignments submitted by users in their group
- Filter assignments by group, course, lesson and status (approved/not approved)
- Filter rows by data in any column using the Search field
- Sort submitted assignments by any column
- View the columns that are relevant to them and hide the rest
- Drag and drop to reorder columns
- Drag to resize columns
- Click on VIEW to review the assignment info.
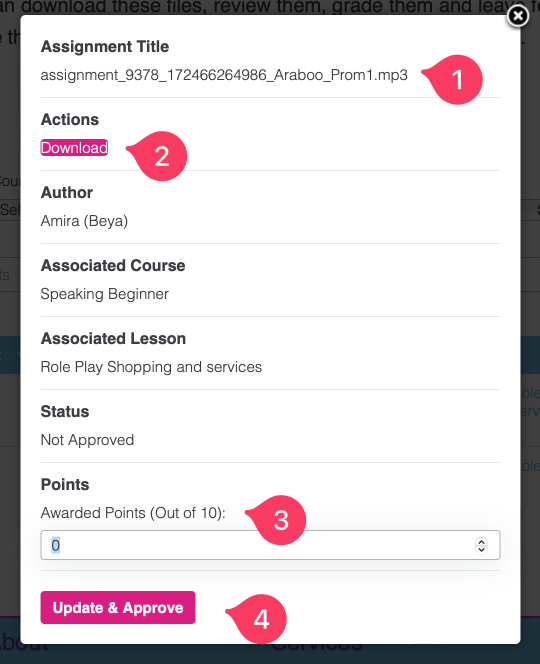
When the windows pops up, you will see the file title (1), you can download the file for reviewing (2), give a grade for the assignment (3), and update and approve it (4).
The student will be notified of the grade.


